


No special equipment, gram measurements, or exact timing needed.
I have to admit that I didn’t know there was anything different in how sourdough is made compared to any other bread until i was an adult. When I was a kid, my mom bought it for sandwich bread for a while and I just liked that it was white (making it through middle school with whole grain sandwich bread- or worse, sprouted grain bread- was, well, rough, from my shy and insecure point of view).
It wasn’t until I was in my late 20s and a friend (a fellow “crunchy” mom) excitedly told me that she had started making sourdough and asked if I wanted some “starter” that I learned that there was a unique method for making this type of bread. I did get some starter from my friend and was greatly confused by her instructions but thought, “oh well, I’ll just look up some online”.

Apparently looking up sourdough instructions online is like googling instructions for how to perform a brain surgery. “What are they talking about ‘stretching and folding’?” “Grams? Why is everything in grams?!” Different recipes recommended different temperatures, and used terminology I was sure couldn’t be related to baking (cold proofing?) But I finally kind of figured it out and learned how to at least make what was recognizable as a loaf of bread (a very dense loaf, but a loaf nonetheless).
Then I got morning sickness when I was pregnant with my third and the smell and texture and everything about the starter became unbearable to me. It sat in my fridge, un-fed because I hated it so much I couldn’t even open the lid to give it a little flour and water, until it had a dark black layer on top (which I now know is natural, normal and, amazingly still a salvageable starter) that I thought was mold. I threw away the whole jar- a mason jar!- because I could not fathom the thought of smelling it to wash it (morning sickness is so weird). Then I basically forgot sourdough existed.
About two years after I had thrown away my poor jar and starter, another friend gave me some starter randomly one day, and, since it was no longer repulsive to me, I decided to give it another go. This time, I actually began learning the reasons sourdough is healthier than other bread and became motivated by that to continue with it. I had started researching pro-metabolic eating and looking into my own diet, which was already very “healthy” by mainstream standards (low sugar, vegetarian, lots of raw veggies and nut milks) and finding that I was actually not nourishing myself very well at all. I added meat back into my diet, cut out the nut milks and cruciferous veggies and added more dairy and more fruit. I began to avoid PUFAs (poly-unsaturated fatty acids— the kind of fat that mainstream health tells us are healthy) at all cost and intentionally went for more saturated fats instead. I also learned about the great benefits of soaking or sprouting grains- and thats where sourdough fits in!

Sourdough is wheat bread that uses a wild yeast rather than a packaged yeast. The wild yeast is in the starter, it forms and occurs naturally and is actually what people used for thousands of years before commercial yeast was available.
Side note: I’m learning that healthy eating is much simpler than it’s made out to be- often just observing how people eat/ate without all our modern ways is pretty helpful. Farm mineral-rich vegetables and fruits from the soil (without synthetic fertilizers)? Yes. Drink raw milk from healthy animals? Yes. Eat lots of properly prepared grains, fruits, cooked vegetables, meat and dairy? Yes. Heavily processed grains and sugars? No. Lots of unsaturated fats? No. Loads of trail mix and raw kale for their “health benefits”? No. Low-carb, non-fat, zero-sugar anything? Nope.
I believe 100% that God led me to the resources I’ve found that have taught me a wholesome approach to eating in a nourishing way; being properly nourished has been an answer to many prayers that I had prayed for years. I sleep without chronic insomnia now, for the first time in my life. My emotions and hormones are so much better regulated. My immune system, which has always been very weak, has grown so strong! I’m amazed by how much this all has improved in not very much time and thank God for it often.
Anyway- back to bread.
Sourdough falls into the category of a soaked grain; it’s bulk rise/ferment is for about 12 hours, which allows for the components of the wheat to start to break down (because of both the water and the yeast), making it easier for our bodies to digest. Even many people with gluten intolerance are able to eat real sourdough! This is because the wheat is basically already partially “digested” and easy for the gut to recognize and utilize nutrients from.
As I’ve baked sourdough bread more and more, I’ve simplified my own process and tested what works for a great but non-complicated loaf.
It seems like there are two sides of sourdough method- one being as easy as possible/make it in the bread maker, and the other being the grams and proofing basket type who set timers for how long their starter should be out. I guess I’ve landed in the middle of these- I definitely don’t have the time or energy to devote to timing it perfectly and don’t want to spend a fortune on supplies, but I also do want my loaves to be pretty and have that wonderful crispy texture and complex taste.
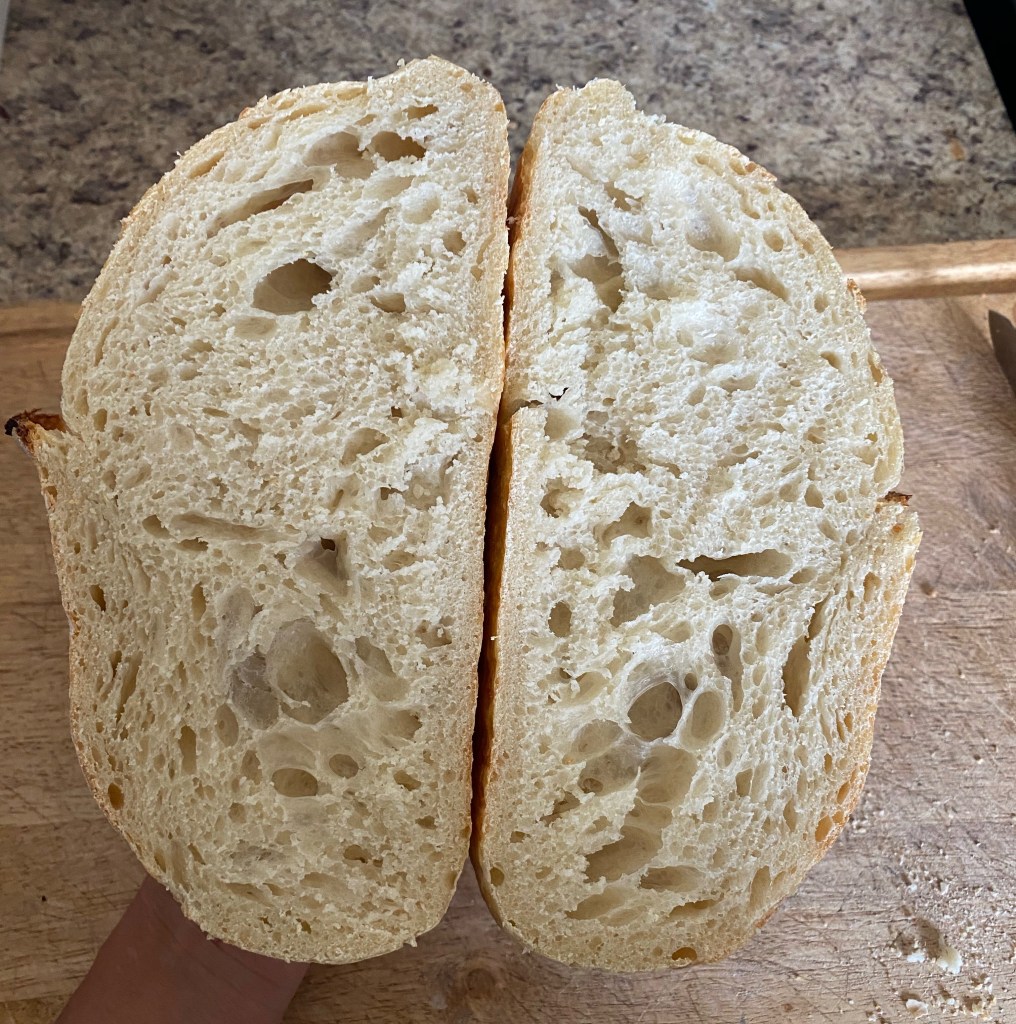
My instructions accomplish this middle ground. They make as pretty and airy a loaf as is possible for the level of low maintenance, low stress, non commitment, minimal supplies, and imperfect measurements.
Steps:
The main parts of baking sourdough are
1. Feeding starter
2. Mixing ingredients
3. Stretching dough
4. Bulk rise/ferment
5. Shaping
6. (Proofing)
7. Baking
1. Feeding the starter:
The first time I learned sourdough was made with a “starter” I pictured it more like kefir grains or a kombucha SCOBY- a “thing” that is placed in with the batch and multiplies and is taken out of the batch. When I saw it, though, it looked like just flour and water… and that’s all it is- flour and water. What is active and multiplies in it is the yeast. This is yeast that was “caught” from the air. At some point someone started the starter that I’ve been using for years now by mixing just flour and water and leaving it in the right conditions to catch yeast, then they gave some to someone and that person gave some to someone else and on down the line until my friend gave some to me. This is how I would recommend getting starter- from someone who has an active starter and is willing to share. But it is also possible to buy a dehydrated starter or start your own.
Once in possession of a starter, all that is necessary to keep it alive is to feed it once in a while- that is, to give it some fresh flour and fresh water. The jar the starter is in should be at least a pint, as most recipes will call for a half cup to a cup of starter and the jar will need to be twice that size since it will double in size then shrink back down as it becomes active.
Before starting a batch of sourdough, the starter will need to be active. If it’s been sitting in the fridge for a week, its going to be flat and “dead”. So, several hours before mixing a batch of dough, discard most of the starter (this can be used in other recipes like this one for sourdough cookies/pancakes/biscuits) or dump it in the compost or to the chickens (its actually very healthy for them!) leaving behind a little starter in the jar. I find that less is better and usually dump the whole jar out and “feed” what’s left clinging to the inside of the jar. I don’t measure anything when feeding and my starter stays very healthy, it seems to appreciate the inconsistency. After dumping the jar out, I add about an inch of water (in my pint jar) and then add flour to make the jar about half full and mix it well with a fork. Estimated measurements would be about two tablespoons of starter 1/3 cup of water and 1/2 cup of flour. Cover the jar with a napkin or cheesecloth secured with a rubber band (or hair-tie, as usually is my case) and leave at room temperature, waiting until its doubled in size to use it. It doesnt need to be used that exact moment. Usually by the time I get to my starter, it’s already doubled, sank back down, and sat for a few hours, and I’ve always had success with it. Many times I’ve used a very, very flat starter and had success, it just needs to have a longer bulk rise.
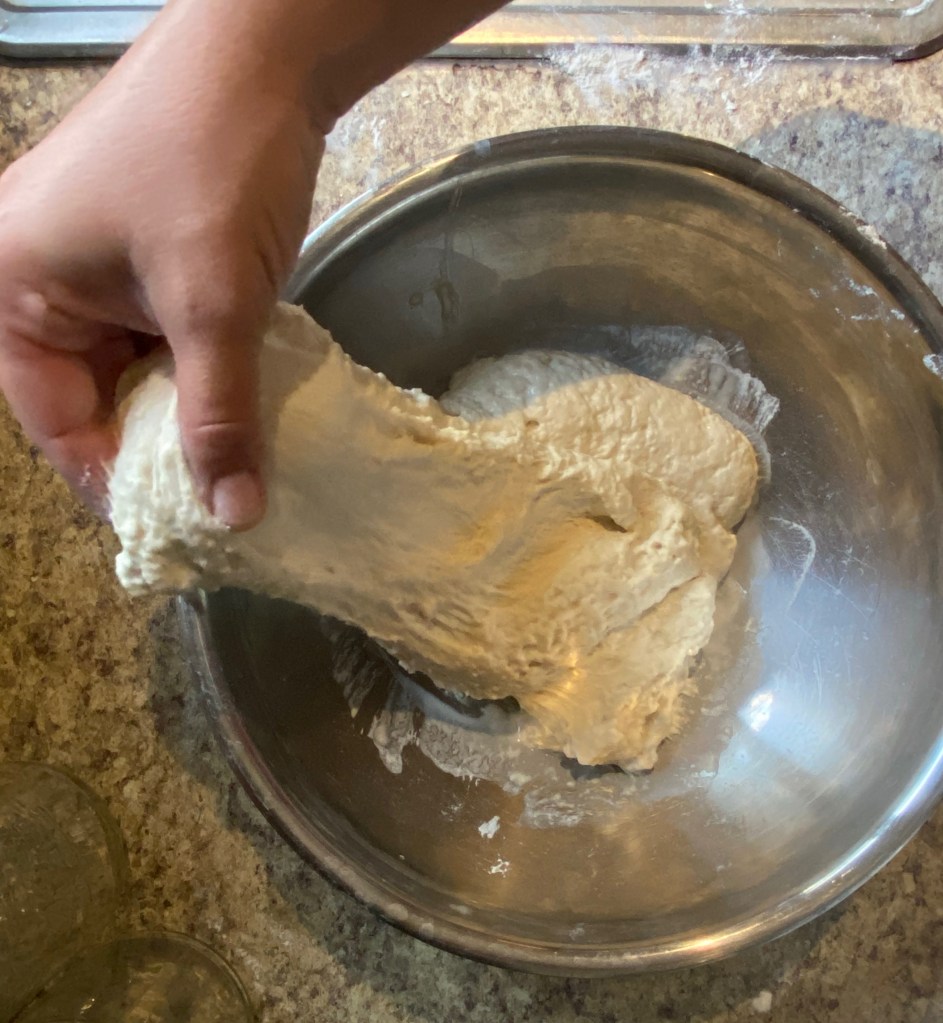
2. Mixing ingredients is pretty straightforward- dump the starter into a large bowl, add 2 scant cups of water, 4 cups of flour, and 2 teaspoons of salt (in that order- salt needs to not be in direct contact with starter or it could kill it) and mix well. Dough will be sticky and shaggy.
3. Stretching. This is going to take the place of kneading. Let the newly mixed dough rest for about 15 minutes then stretch it by grabbing a “side”, pulling it up, and pressing it down into the center. Repeat on 3 more sides. Let it rest again for another 15 minutes and stretch again, rest and repeat again if you have time. The more you stretch, the better the gluten will develop and the more air bubbles your bread will have in it.
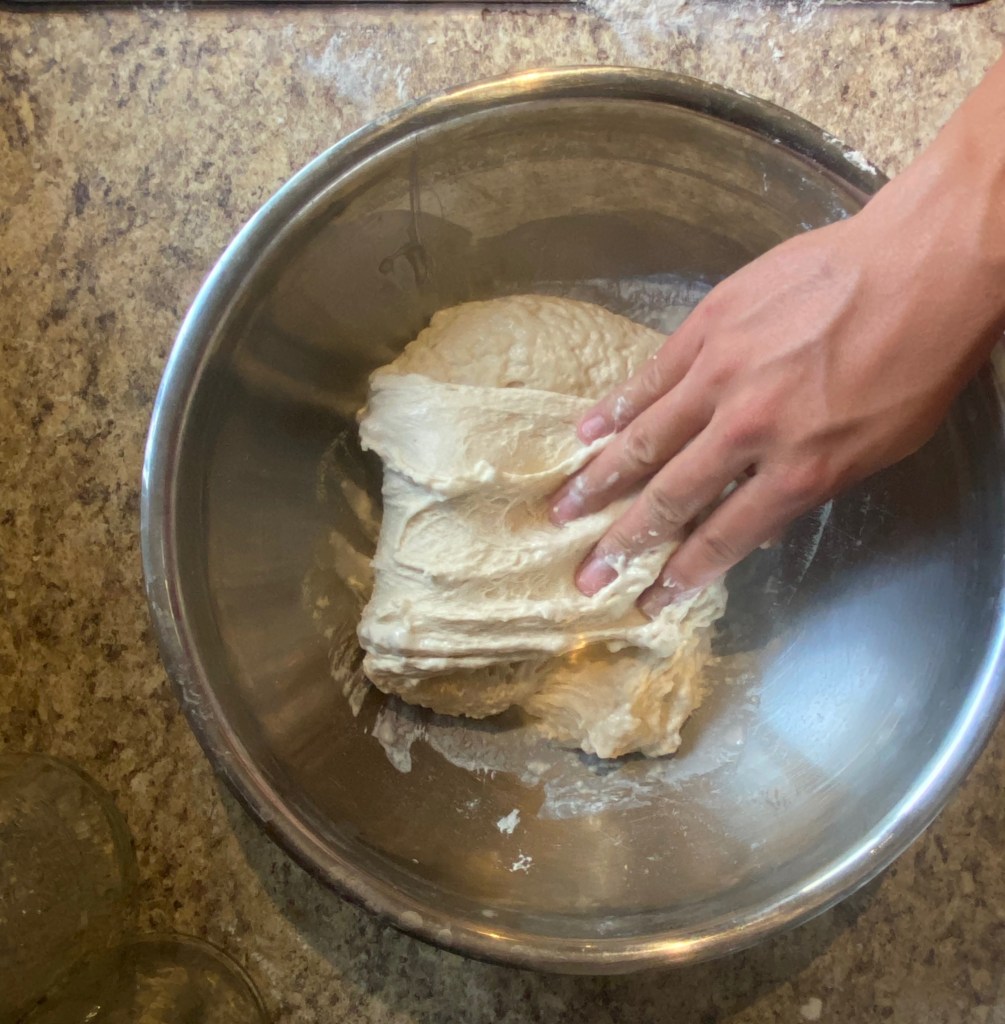
4. Bulk rise. This is the fermentation that makes sourdough such a healthy grain option. After stretching, cover your dough and let it ferment and rise for 8-12 hours. I usually let mine rise overnight soI can bake in the morning.
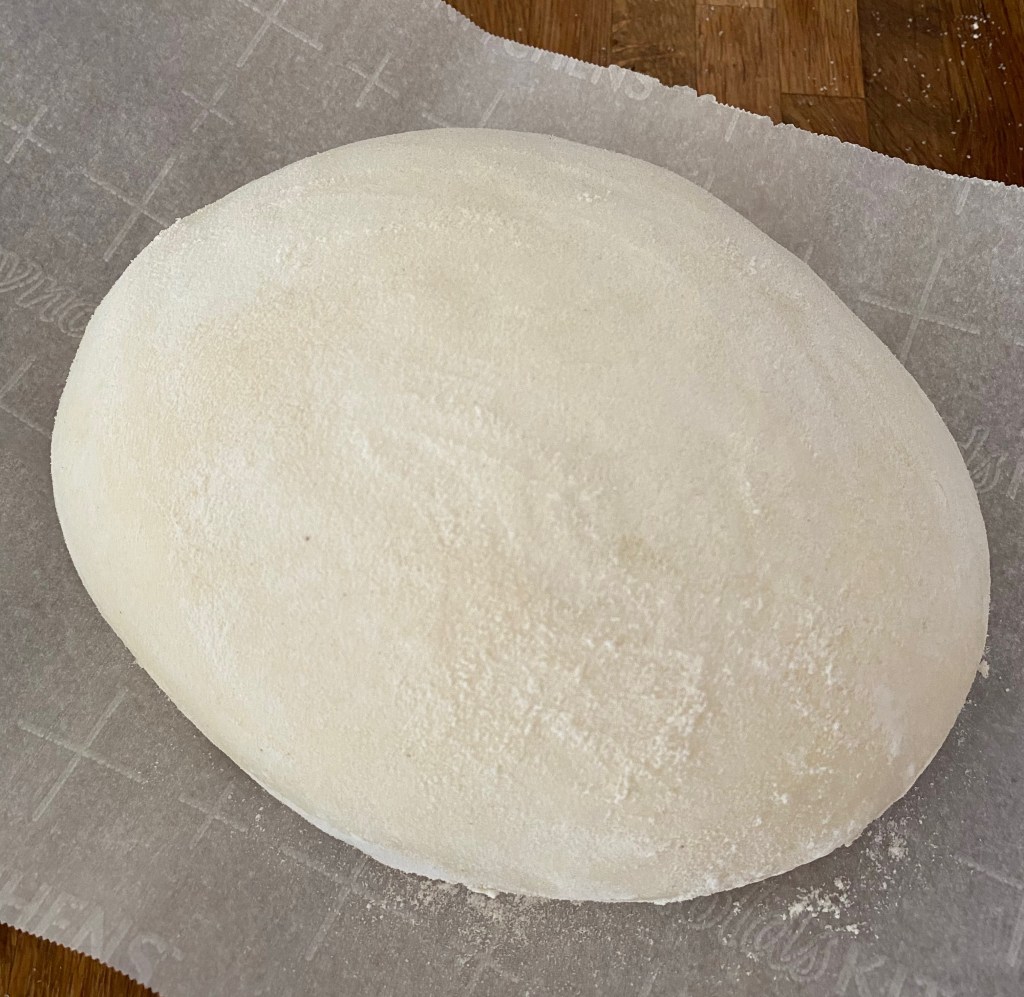
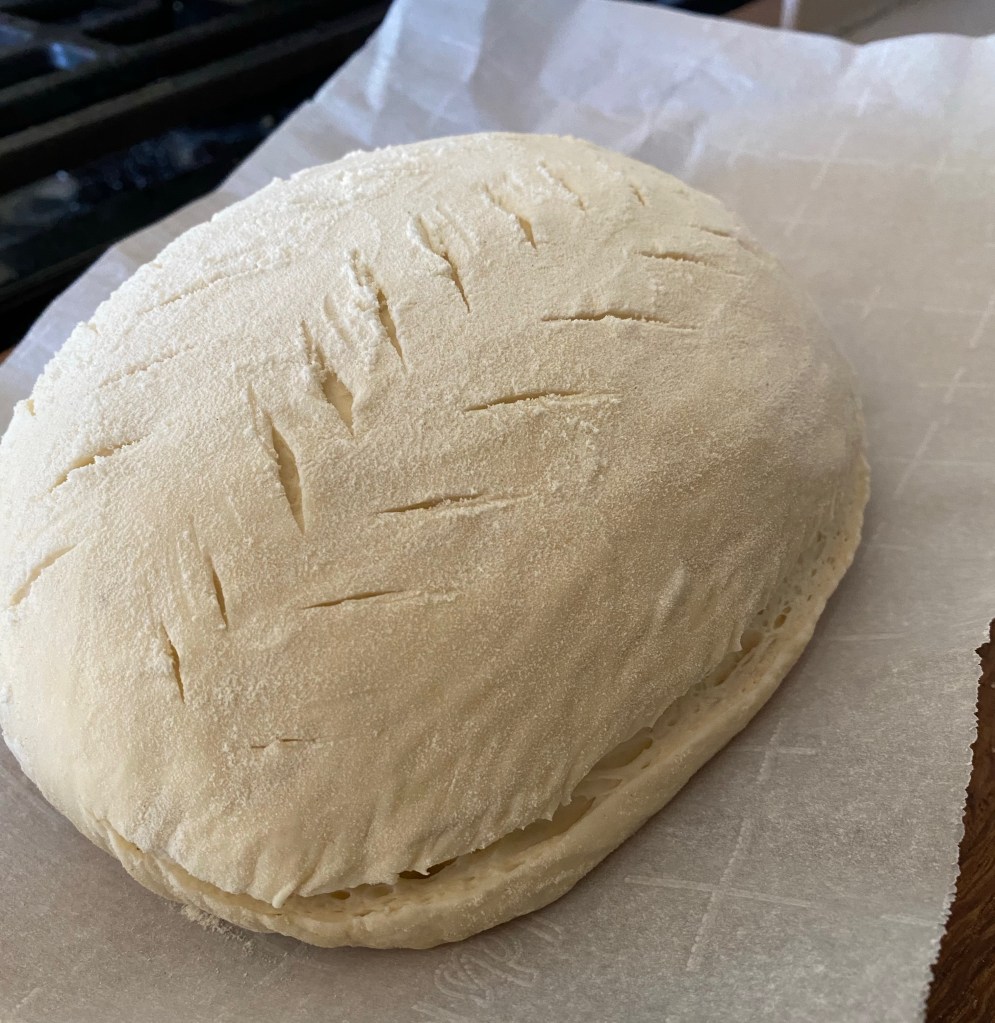
5. Shaping. After the bulk rise, the dough should have increased in size and jiggle in the bowl. Scrape it out of the bowl onto a counter. With well floured hands, pull the dough towards you while “tucking” the bottom in. Flour hands again and simultaneously turn, pull, and tuck the dough, repeating until you’ve formed a tight round loaf shape. Place on parchment paper.
6. Proofing. Put dough in refrigerator to cold proof. This makes scoring much easier; it doesn’t need to rise during this time.
7. Baking. While dough is in fridge, preheat your oven and the pot you’ll be using to 450°. The best baking dish will be one with a lid, like a Dutch oven or pot with lid that has no plastic handles. If no lidded dish is available, use a regular loaf pan and cover with foil.
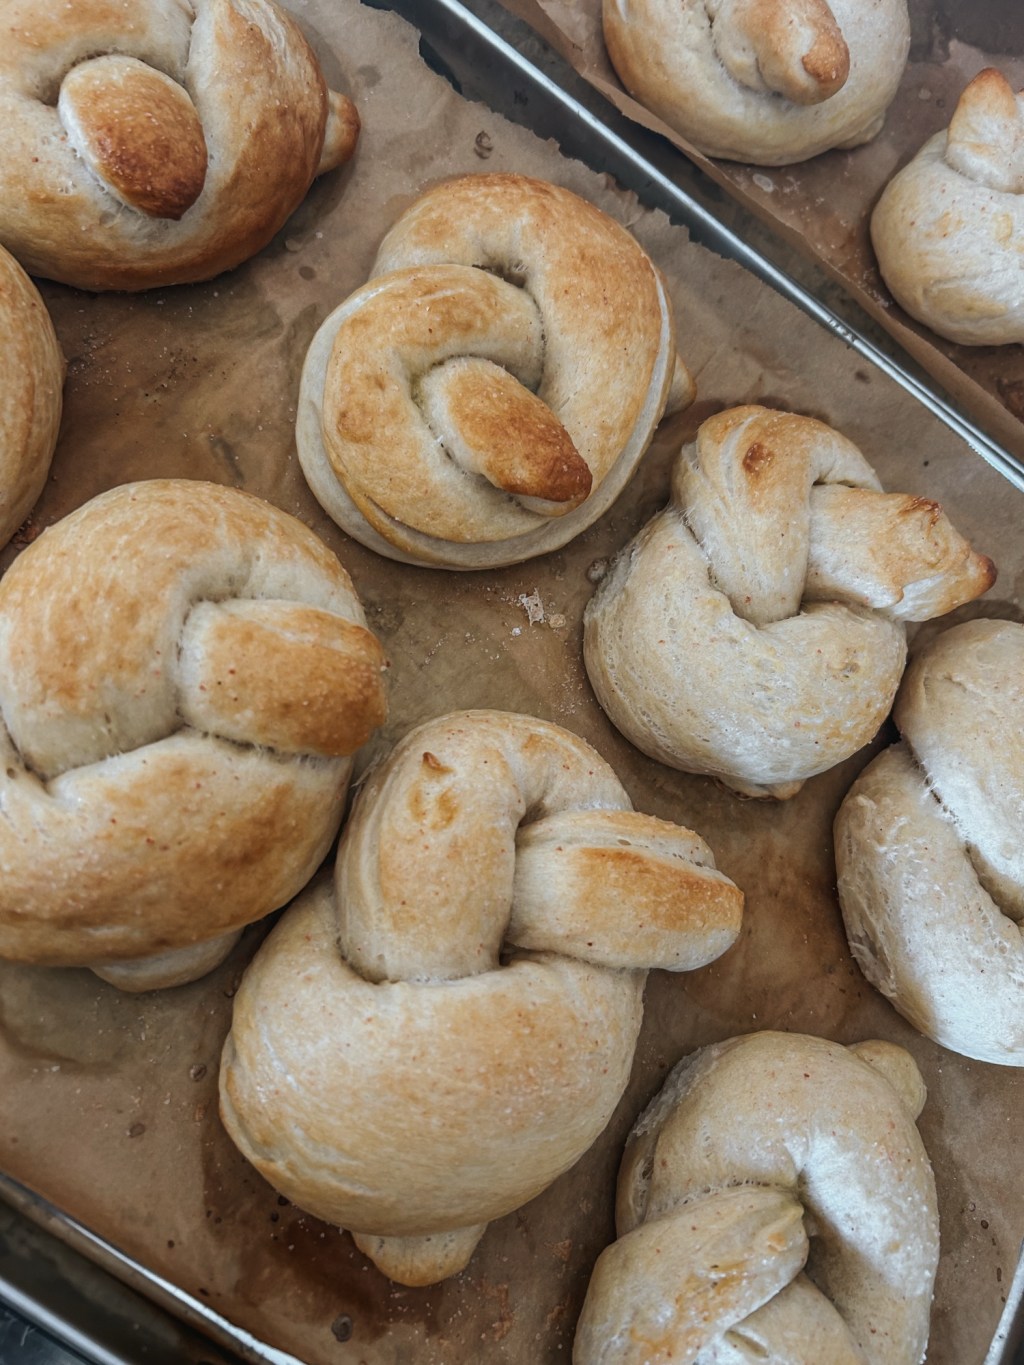
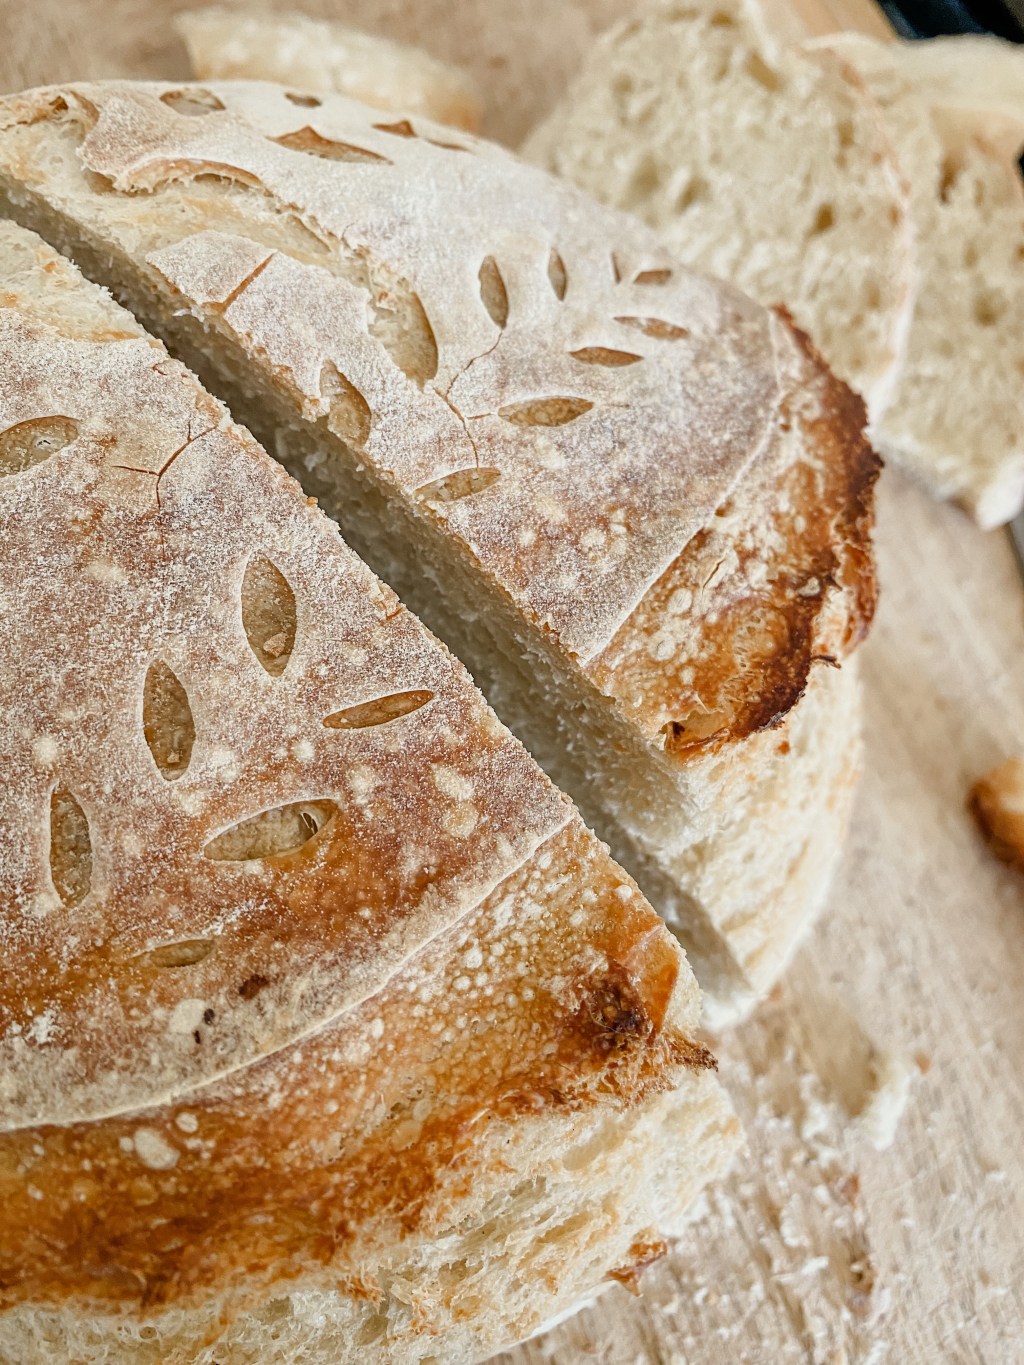
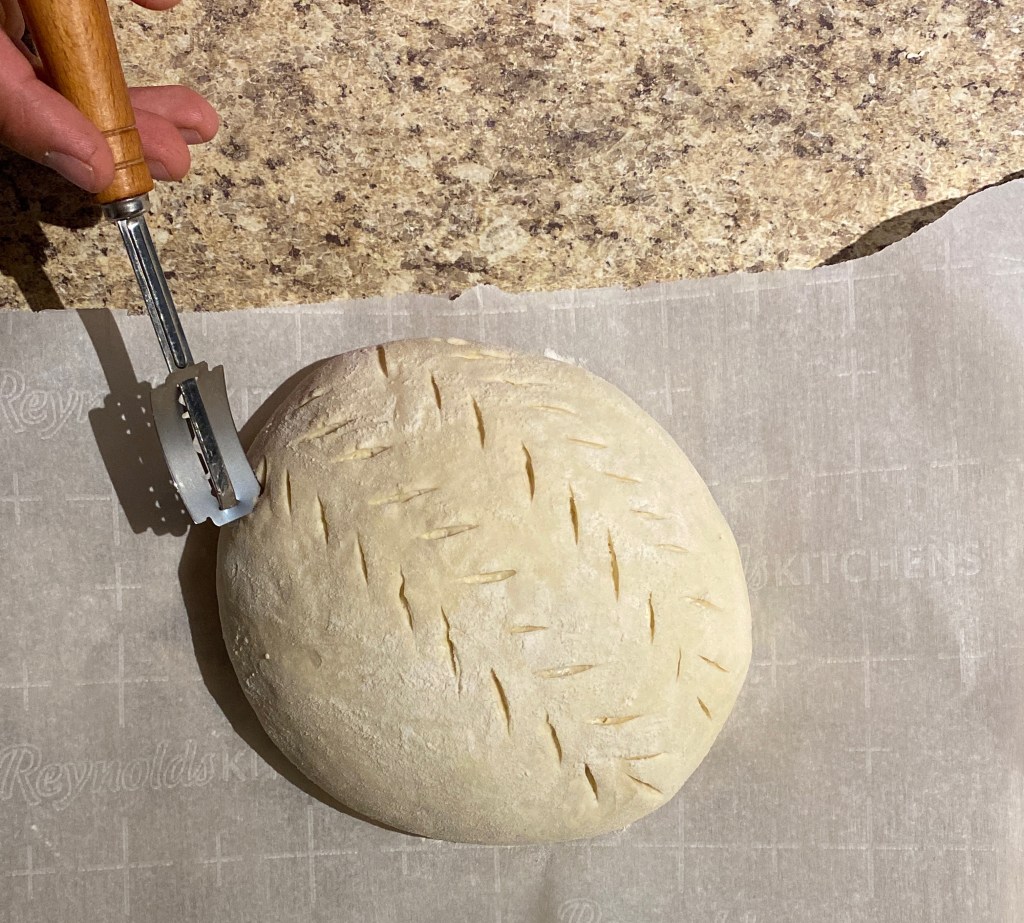
Once preheated, take dough out of fridge and score a long 1/4 inch deep cut across the top or side with a sharp, non-serrated knife or x-acto knife. Also score small, very shallow designs for decoration.
The only “special equipment” I use is a bread lame for scoring. Scoring is much easier with one, though definitely possible without.
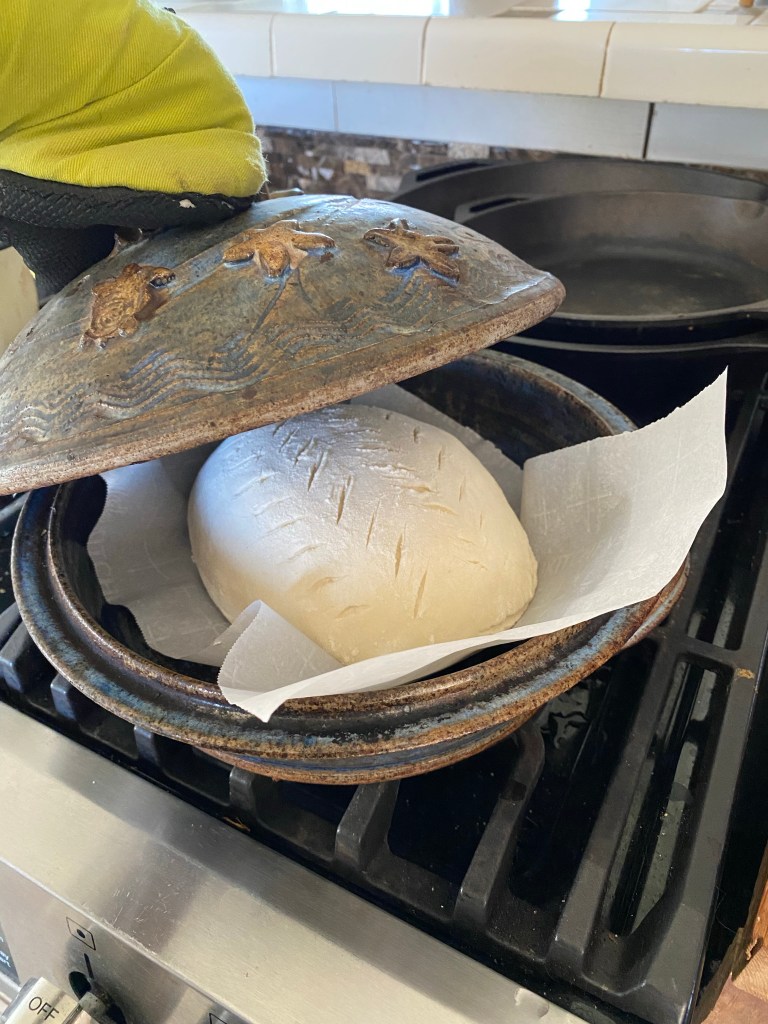
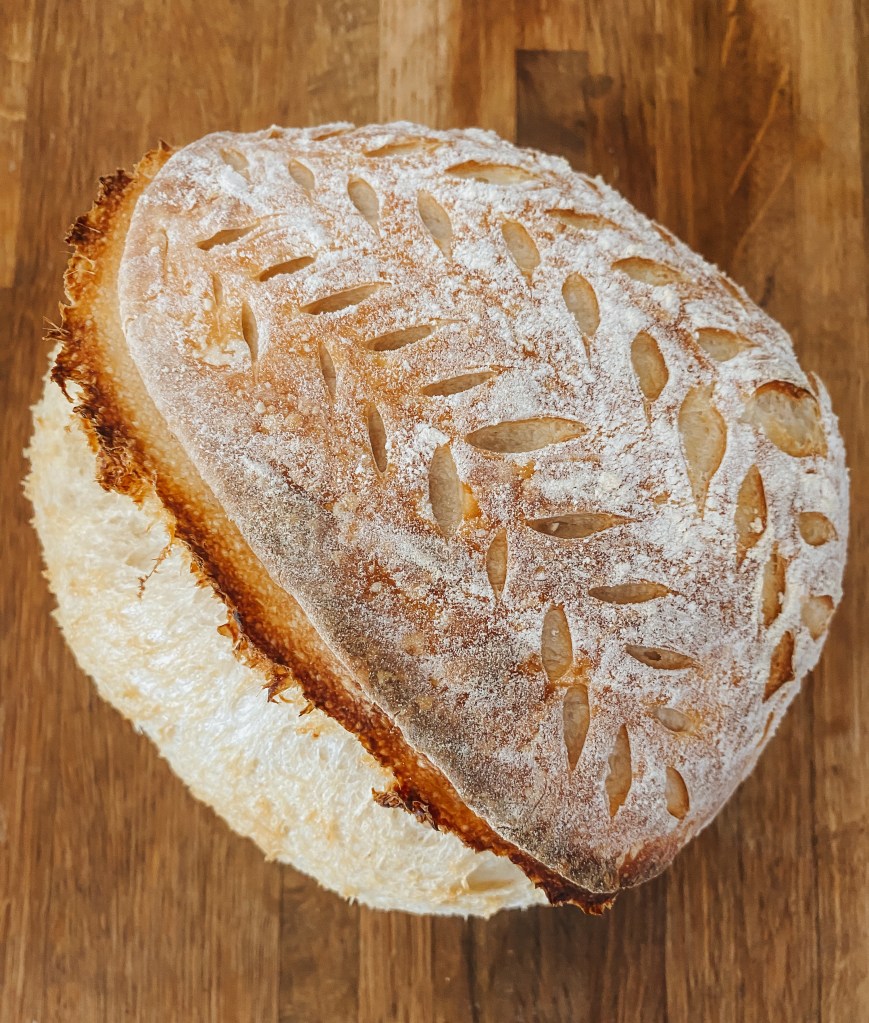
Place dough in heated pot (this is where the parchment paper comes in especially handy) and cover with lid. Bake with lid on for 30 minutes, then take lid off and bake for 10 more minutes or until the bread is very golden-brown.
Basic Recipe
Sourdough Artisan Loaf
Ingredients:
1/2 cup- 1 cup active starter
2 scant cups water
4 cups flour
2 teaspoons salt
Instructions:
-Mix all ingredients together in order.
-Stretching: with wet hands, stretch the dough (grab and fold towards middle on each side). Repeat every 15 minutes (2-3x).
-Bulk rise/ferment: cover dough overnight (or for about 8-12 hours).
-Shaping: after the bulk rise (dough should be bigger and jiggle in bowl) use floured hands to shape dough into a ball on the counter by simultaneously turning and pulling it toward you while tucking in the bottom.
-Place on parchment paper, let proof in the fridge for about an hour (it’s ok if it doesn’t rise).
-Preheat loaf pan/pot/Dutch-oven with a lid (or use foil if no lid) in oven to 450°. Transfer the dough into the hot pan, score a shallow line (1/4” deep) with a bread lame across the top of the dough (and very shallow decorative designs) to allow expansion.
-Bake with the lid on for 30 minutes then take the lid off and bake for 10 more minutes or until very golden-brown.
-Let cool completely before cutting.


One response to “Simple Artisan Sourdough Instructions”
[…] still amazed at the amazing flavor that comes from just flour, water, and salt in a classic sourdough loaf, but sometimes you want to make more than a regular loaf. This recipe for a sweet sourdough bread […]
LikeLike